ProSA - Protocol Service Adaptor
ProSA is an open-source Rust implementation of Worldline’s service provider solution. ProSA was designed to provide a simple and lightweight protocol service adaptor for service-oriented architectures and to offer a flexible and scalable platform for developing and deploying microservices. This allow developers to focus on writing business logic while ProSA takes care of the underlying infrastructure concerns.
Contributing
ProSA is free and open source. You can find the source code on GitHub. ProSA relies on Worldliners to fix bugs and add features, but accept contribution from the community: if you’d like to contribute, please read the CONTRIBUTING guide.
License
The ProSA source and documentation are released under the LGPLv3.
This license has been chosen to keep the framework and some modules open source, while allowing for other modules to be proprietary. In fact, ProSA contains no direct references to Worldline’s private properties.
Version
This book is intended for version 0.4.3 of ProSA.
Foreword
While programming languages continue to change and evolve, the foundational architectural concepts in software development remain steadfast.
This book explores these enduring principles through the lens of ProSA, a project rooted in ideas originally conceived by Michel Roux in COBOL and Java. Our role has been to take the lead on development, adapting these concepts to the modern Rust language.
The goal of this book and the overarching ProSA initiative is to equip both developers—whether engaged in low-level or high-level development—and operations (OPS) with a framework that supports their projects.
We aim to integrate timeless concepts with modern programming and operational practices, empowering teams to create robust solutions.
Worldline, a vast enterprise with an extensive platform ecosystem, exemplifies the value of full integration. By providing a product that seamlessly fits into this stack, developers and OPS professionals alike are free to focus on what truly matters: implementing and maintaining their own business solution.
We hope this book offers valuable insights and guidance as you embark on your journey with ProSA.
— Jérémy Hergault
Introduction
Welcome to the ProSA ecosystem. This book will help you run and build a ProSA.
Who ProSA is for
ProSA is ideal for people who want to run and build transactional systems.
How to use this book
This book is organised in three main topics:
-
OPS: To give you all the assets you need to run your ProSA
-
Adaptor: A section for application developers who want to use the existing ProSA ecosystem and build their applications around it
-
Processor: For more advanced developers who want to add new processors in ProSA.
These topics assume that you’re reading them in sequence from OPS through Adaptor to Processor. Later chapters build on concepts from earlier chapters. It’s important that you understand concepts from previous chapters if you want to dive into a specific topic.
-
OPS people only need to understand the OPS chapter
-
Applicative developers need to read OPS and Adaptor chapters
-
More advanced developers need to read this book in its entirety
Source code
The source files from which this book is generated can be found on GitHub.
Architecture
This chapter provides a high-level overview of the ProSA architecture, explaining how all the components interact to form a working microservice platform.
Overview
ProSA follows a service bus pattern. At its core, a central Main processor routes messages between autonomous Processors, each of which communicates with external systems through an Adaptor. Messages flow through the system using an internal format called TVF (Tag-Value Field).
graph TB
    ext_a(External System A)
    ext_b(External System B)

    subgraph prosa[ProSA Instance]
        subgraph main[Main - Service Bus]
            main_task[Main task]
            table>Service table]
            table <--> main_task
        end

        subgraph proc_a[Processor A]
            task_a[Task]
            adaptor_a[Adaptor A]
            task_a <--> adaptor_a
        end

        subgraph proc_b[Processor B]
            task_b[Task]
            adaptor_b[Adaptor B]
            task_b <--> adaptor_b
        end

        table --> task_a
        table --> task_b
    end

    ext_a <--> adaptor_a
    ext_b <--> adaptor_b
Components
Main (Service Bus)
The Main is the central hub of a ProSA instance. It is responsible for:
- Message routing: forwarding requests and responses between processors
- Service table management: maintaining a registry of which processors provide which services
- Processor lifecycle: tracking processor registration, removal, crashes, and restarts
- Observability: collecting system-wide metrics (RAM usage, service counts, processor states)
- Shutdown coordination: propagating shutdown signals to all processors
There is exactly one Main per ProSA instance. It runs on the Tokio async runtime and processes messages from its internal queue.
Processors
A Processor is an autonomous unit that runs in its own thread(s). Processors:
- Register with the Main to join the service bus
- Declare services they can provide (e.g.,
"PAYMENT","AUTH") - Send and receive messages through the Main’s routing system
- Run independently, each in their own Tokio runtime (configurable: single-thread, multi-thread, or shared with Main)
Processors communicate exclusively through the Main bus using internal messages (InternalMsg):
| Message Type | Purpose |
|---|---|
Request | Send a transaction to a service for processing |
Response | Return the result of a processed request |
Error | Return an error for a request (timeout, unreachable, protocol error) |
Service | Update the processor’s copy of the service table |
Shutdown | Ask the processor to stop gracefully |
Adaptors
An Adaptor is the bridge between a processor and the outside world. It handles:
- Protocol translation: converting external protocol messages (HTTP, TCP, custom binary, etc.) into internal TVF messages
- Initialization: setting up connections and resources when the processor starts
- Termination: cleaning up when the processor shuts down
Each processor handle their adaptor as they wish. The adaptor is defined as a trait, so different protocol implementations can be swapped in without changing the processor logic.
Adaptors can return values either synchronously or asynchronously using the MaybeAsync enum.
TVF (Tag-Value Field)
TVF is the internal message format. It is a trait, not a concrete type, which means different implementations can be used depending on performance or protocol requirements.
The TVF trait provides a key-value interface where fields are identified by numeric IDs and can hold various types: strings, integers, floats, bytes, dates, and nested TVF buffers.
SimpleStringTvf is the built-in reference implementation. See the TVF chapter for details.
Service Table
The Service Table is maintained by Main and distributed to all processors. It maps service names (strings) to processor queues. When multiple processors provide the same service, requests are distributed using round-robin load balancing.
When the service table changes, Main notifies all processors with an updated copy.
Message Flow
Here is the typical flow of a request through ProSA:
sequenceDiagram
    participant ExtA as External System A
    participant ProcA as Processor A (Consume service)
    participant Main as Main (Service Bus)
    participant ProcB as Processor B (Expose service)
    participant ExtB as External System B

    ProcB-->>Main: Register service
    Note over Main: Service table update
    ExtA->>ProcA: Protocol message
    Note over ProcA: Adaptor converts to TVF
    ProcA->>Main: Lookup service
    ProcA->>ProcB: RequestMsg (via service queue)
    Note over ProcB: Adaptor processes request
    ProcB->>ExtB: Protocol message (optional)
    ExtB->>ProcB: Protocol response (optional)
    ProcB->>ProcA: ResponseMsg
    Note over ProcA: Adaptor converts from TVF
    ProcA->>ExtA: Protocol response
Note that processors send requests directly to the target processor’s queue (looked up from the service table). They do not go through Main for every transaction — Main is only involved in service registration and table distribution.
Processor Lifecycle
- Creation:
ProcConfig::create()— allocates the processor with its settings and Main bus reference - Run:
Proc::run()— spawns the processor in its own thread/runtime - Registration:
proc.add_proc()— notifies Main that the processor is active - Service declaration:
proc.add_service_proc(names)— registers the services this processor provides - Processing loop:
internal_run()— the main event loop, receiving and processing messages - Shutdown: on
InternalMsg::Shutdown, the processor callsadaptor.terminate()andproc.remove_proc()
Error Recovery
If a processor’s internal_run() returns an error:
- Recoverable errors: the processor restarts after a delay (exponential backoff up to a configured maximum)
- Fatal errors: the processor is marked as crashed and does not restart
- If ProSA is shutting down, no restart is attempted
OPS
This chapter is for people who want to know how to deploy a ProSA.
ProSA architecture
Before deploying ProSA, you need to understand what it is. ProSA is not a process on its own; It’s a modular system that is fully customizable with a variety of processors and adaptors.
flowchart LR
    proc1(Processor/Adaptor 1)
    proc2(Processor/Adaptor 2)
    proc3(Processor/Adaptor 3)
    procn(Processor/ADaptor N)
    prosa((ProSA))
    proc1 & proc3 <--> prosa
    prosa <--> proc2 & procn
A ProSA is useful with a set of processors and adaptors.
Every processor and its adaptor have a role. For example:
- Incoming HTTP server
- Outgoing database
- Websocket client
- Etc.
Each processor and adaptor has its own configuration to define connection adresses, timers and so on.
Every processor communicates through an internal bus. The goal of this bus is to facilitate transaction flow between processors with different routing configurations. This will be better explained in the next Adaptor chapter.
With this “Lego” architecture, you can include any processor that you need and adapt messages from one protocol to another as you wish. Because a ProSA solution is deployed using multiple processors, we have created the Cargo-ProSA tool to help you orchestrate your solution. We will cover this tool in the next section.
cargo-prosa
ProSA is a framework that handles processors organized around a service bus. As such, ProSA needs to be built from internal or external Processors/Adaptor/Main.
cargo-prosa is a utility to package and deliver a builded ProSA. This builder is packaged within cargo as a custom command to be well integrated with the Rust ecosystem.
Install
cargo-prosa is a Cargo subcommand, so you need to have Cargo installed to use it.
Install cargo-prosa using the following command:
cargo install cargo-prosa
After installation, verify that the command is available and explore its features:
cargo prosa --help
Use
Let’s create a ProSA. You’ll see cargo-prosa commands are quite similar to cargo regarding project management.
cargo prosa new my-prosa
# or from an existing folder, init it
cargo prosa init
cargo-prosa is meant to evolve in the future.
So maybe new things will be introduced.
To update your model, you can update the generated file with cargo prosa update.
At this point you’ll want to add componennts to your ProSA.
To do so, you need to add crates that declare them into your Cargo.toml.
Once it’s done, you can list all component avaible to build your ProSA with cargo prosa list.
This will list all available component:
- Main - Main task (
core::main::MainProcby default). - TVF - Internal message format to use inside your ProSA (
msg::simple_string_tvf::SimpleStringTvfby default). - Processor/Settings - Processor and its associate settings.
- Adaptor - Adaptor related to the processor you want.
If you have different main/tvf, select them:
cargo prosa main MainProc
cargo prosa tvf SimpleStringTvf
Add your dependencies and your processor with its adaptor name
cargo add prosa
cargo prosa add -n stub-1 -a StubParotAdaptor stub
Once your ProSA is specified, the file ProSA.toml will contain the configuration. This file can be edited manually if you want.
Your project uses a build.rs/main.rs to create a binary that you can use.
Configuration
Keep in mind that you also need to have a settings file.
A target/config.yml and target/config.toml will be generated when building.
But you can initiate a default one with:
cargo run -- -c default_config.yaml --dry_run
A configuration file contains:
- name: Name of your ProSA
- observability: Configuration of log/trace/metrics
- a map of processor name -> their settings
Run
When your ProSA is built, you can deploy like any Rust binary. So you’ll find it in the target folder.
And you can run it:
cargo run -- -n "MyBuiltProSA" -c default_config.yaml
# or with binary
target/debug/my-prosa -n "MyBuiltProSA" -c default_config.yaml
Deploy
This builder offer you several possibilities to deploy your ProSA. The goal is to use the easiest method of a plateform to run your application.
Locally
On Linux or MacOS, you can install ProSA directly on your machine:
# Install ProSA
cargo prosa install

# Uninstall ProSA
cargo prosa uninstall
To avoid conflicts, specify a unique name during installation:
cargo prosa install --name dummy
Use the same name when uninstalling:
cargo prosa uninstall --name dummy
If the package isn’t compiled for debug or release (–release), it will automatically compile during installation.
Simulate an installation with:
cargo prosa install --dry_run -n dummy
Linux
When you want to install ProSA with cargo prosa install:
$ cargo prosa install -r -n dummy
Creating service file OK
Copying binary OK
Generating configuration OK
Installed [12183 kB] ProSA `dummy`
Binary file : $HOME/.local/bin/prosa-dummy
Config file : $HOME/.config/prosa/dummy/prosa.toml
Service file: $HOME/.config/systemd/user/dummy.service
And you’ll be able to handle it through systemctl:
$ systemctl --user status dummy.service
○ dummy.service - Local ProSA instance
     Loaded: loaded ($HOME/.config/systemd/user/dummy.service; disabled; preset: enabled)
     Active: inactive (dead)
To install it for the whole system, you can use the --system option:
$ sudo -E $HOME/.cargo/bin/cargo prosa install -r -s -n dummy
Creating service file OK
Copying binary OK
Generating configuration OK
Installed [12184 kB] ProSA `dummy`
Binary file : /usr/local/bin/prosa-dummy
Config file : /etc/prosa/dummy/prosa.toml
Service file: /etc/systemd/system/dummy.service
By installing ProSA system wide, you are able to see the service:
$ sudo service dummy status
○ dummy.service - Local ProSA instance
     Loaded: loaded (/etc/systemd/system/dummy.service; disabled; preset: enabled)
     Active: inactive (dead)
MacOS
On MacOS it’s the same as Linux, but with MacOS specifics.
So you can install it, and if the binary don’t exist, it’ll compil the project:
$ cargo prosa install -r -n dummy
Creating service OK
   Compiling ...
    Finished `release` profile [optimized] target(s) in 24.58s
Copying binary OK
Generating configuration OK
Installed [10578 kB] ProSA `dummy`
Binary file : $HOME/.local/bin/prosa-dummy
Config file : $HOME/.config/prosa/dummy/prosa.toml
Service file: $HOME/Library/LaunchAgents/com.prosa.dummy.plist
And once cargo-prosa installed the service, MacOS should notify you to indicate the new created service:

You can now load it and run it with:
launchctl load $HOME/Library/LaunchAgents/com.prosa.dummy.plist
and you can uninstall it with:
$ launchctl unload $HOME/Library/LaunchAgents/com.prosa.dummy.plist
$ cargo prosa uninstall -n dummy
Remove service OK
Remove binary OK
Uninstalled ProSA `dummy`
Binary file : $HOME/.local/bin/prosa-dummy
Config file : $HOME/.config/prosa/dummy/prosa.toml
Service file: $HOME/Library/LaunchAgents/com.prosa.dummy.plist
Container
Containerization will allow you to build and load ProSA in an image:
# Generate a Containerfile
cargo prosa container
# Generate a Dockerfile
cargo prosa container --docker
For your own needs, you can:
- Select from which image the container need to be build
--image debian:stable-slim - Along that you may have to specify the package manager use to install mandatory packages
--package_manager apt - If you want to compile ProSA through a builder, you can specify it with
--builder rust:latest. A multi stage container file will be created.
Deb package
Deb package can be created with the cargo-deb crate.
To enable this feature, create, init or update your ProSA with the option --deb.
It’ll add every needed properties to generate a deb package.
The deb package will include the released binary, a default configuration file, and a systemd service file.
RPM package
RPM (Red Hat Package Manager) package can be created with the cargo-generate-rpm crate.
To enable this feature, create, init or update your ProSA with the option --rpm.
It’ll add every needed properties to generate an rpm package.
The rpm package will include the released binary, a default configuration file, and a systemd service file.
Configuration
ProSA uses a standard YAML file to configure itself, as well as its sub-processors and adaptors.
Single configuration file
By default, ProSA will look for the configuration file at /etc/prosa.yml.
The configuration is structured to include common settings and your desired processors:
name: "prosa-name"
observability:
  level: debug
  metrics:
    stdout:
      level: info
  traces:
    stdout:
      level: debug
  logs:
    stdout:
      level: debug

proc-1:
  # Your processor 1 configuration

proc-2:
  # Your processor 2 configuration
Multiple configuration file
You can also spread the configuration of your ProSA processors over multiple files. Instead of specifing a single file, you can indicate a folder containing all your configuration files.
# /etc/myprosa/main.yml

name: "prosa-name"
observability:
  level: debug
  metrics:
    stdout:
      level: info
  traces:
    stdout:
      level: debug
  logs:
    stdout:
      level: debug
# /etc/myprosa/proc_1.yml

proc-1:
  # Your processor 1 configuration
# /etc/myprosa/proc_2.yml

proc-1:
  # Your processor 2 configuration
Environment variables
ProSA can also be configured using environment variables, assuming you only have one ProSA instance running on your system.
For example, you can set the ProSA name by filling the variable PROSA_NAME="prosa-name".
Observability
For observability, ProSA uses OpenTelemetry to collect metrics, traces, and logs.
Observability is handled through the Observability settings.
Settings
Parameters are specified in your ProSA settings file. You can configure your observability outputs to be redirected to stdout or an OpenTelemetry collector. You can also configure your processor to act as a server that exposes those metrics itself.
Of course all configurations can be mixed. You can send your logs to an OpenTelemetry collector and to stdout simultaneously.
Attributes
For each of your observability data, you can configure attribute that will add labels on your data.
These attribute should follow the OpenTelemetry resource conventions.
Some of these attributtes are automaticcaly field from ProSA depending of your environment:
service.nametook from prosa namehost.archif detected from the compilationos.typeif the OS was detectedservice.versionthe package version
For your logs and traces (but not metrics to avoid overloading metrics indexes), you’ll find:
process.creation.timeprocess.pid
In the configuration you’ll have:
observability:
  attributes:
    # Override the service.name from ProSA
    service.name: "my_service"
    # Overried the version
    service.version: "1.0.0"
  metric: # metrics params
  traces: # traces params
  logs:   # logs params
Stdout
If you want to direct all logs to stdout, you can do something like this:
observability:
  level: debug
  metrics:
    stdout:
      level: info
  traces:
    stdout:
      level: debug
If you use tracing, you will get richer log output compared to log:
observability:
  level: debug
  metrics:
    stdout:
      level: info
  logs:
    stdout:
      level: debug
If both traces and logs are configured, only the traces configuration will be applied.
OpenTelemetry
gRPC
You can also push your telemetry to a gRPC OpenTelemetry collector:
observability:
  level: debug
  metrics:
    otlp:
      endpoint: "grpc://localhost:4317"
  traces:
    otlp:
      endpoint: "grpc://localhost:4317"
If you specify traces, only traces (including logs) will be sent. To send logs separately, use the logs:
observability:
  level: debug
  metrics:
    otlp:
      endpoint: "grpc://localhost:4317"
  logs:
    otlp:
      endpoint: "grpc://localhost:4317"
HTTP
To use an HTTP OpenTelemetry collector:
observability:
  level: debug
  metrics:
    otlp:
      endpoint: "http://localhost:4318/v1/metrics"
  traces:
    otlp:
      endpoint: "http://localhost:4318/v1/traces"
To send logs via HTTP, specify the logs (without the traces):
observability:
  level: debug
  metrics:
    otlp:
      endpoint: "http://localhost:4318/v1/metrics"
  logs:
    otlp:
      endpoint: "http://localhost:4318/v1/logs"
Grafana Cloud
You can connect ProSA directly to Grafana Cloud to send metrics, logs, and traces. To do so, you need to create an OpenTelemetry Collector Grafana Cloud datasource.
To set it up, you have to:
- Select OpenTelemetry SDK, with Other as language (or Rust if it’s available)
- Use Linux as infrastructure
- Use a direct connection with a token
- Decode the base64-encoded basic authorization token from the
Create an Instrumentation Instance. You’ll get anid:passwordto set OTLP credentials with.
If your token contains a trailing
=, you need to replace it with%3Dto ensure a correct URL format.
With this information, set up your observability stack (look before if you want to set up traces):
observability:
  # For the datasource setup
  attributes:
    - service.name: my-app
  level: debug
  metrics:
    otlp:
      endpoint: "https://1234567:glc_<value>@otlp-gateway-prod-eu-west-2.grafana.net/otlp/v1/metrics"
  traces:
    otlp:
      endpoint: "https://1234567:glc_<value>@otlp-gateway-prod-eu-west-2.grafana.net/otlp/v1/traces"
  logs:
    otlp:
      endpoint: "https://1234567:glc_<value>@otlp-gateway-prod-eu-west-2.grafana.net/otlp/v1/logs"
Prometheus server
Prometheus works as a metric puller.
flowchart LR
    prosa(ProSA)
    prom(Prometheus)
    prom --> prosa
As such, you can’t directly send metric to it. It’s the role of Prometheus to gather metrics from your application.
To do this, you need to declare a server that exposes your ProSA metrics:
observability:
  level: debug
  metrics:
    prometheus:
      endpoint: "0.0.0.0:9090"
You also need to enable the feature
prometheusfor ProSA.
SSL
Configuring SSL is a complex task, but many options have been provided to make it accessible and flexible.
Library selection
ProSA through traits:
SslStoreto handle specific library certificate Store.SslConfigContextto handle specific client/server SSL context for TLS negociation.
allows the use of OpenSSL and later more SSL libraries.
By default, ProSA will use OpenSSL, but if you want, you can use the following features to change it:
openssl: Use OpenSSL by defaultopenssl-vendored: Vendored OpenSSL that compiles and statically links to the OpenSSL library
Store
You have two options to configure an SSL store:
- Specify a store path that will include all certificates found within the folder and its subfolders
- Specify individual certificates directly in PEM format
Store path
When you declare a store path, the system scans the folder and subfolders to load all .pem and .der certificates it finds.
To configure it, just specify the path:
store:
  path: "/etc/ssl/certs/"
Store certificates
If you prefer to include your certificates directly in the configuration (in PEM format), you can do so as follows:
store:
  certs:
    - |
        -----BEGIN CERTIFICATE-----
        MIICGzCCAaGgAwIBAgIQQdKd0XLq7qeAwSxs6S+HUjAKBggqhkjOPQQDAzBPMQsw
        CQYDVQQGEwJVUzEpMCcGA1UEChMgSW50ZXJuZXQgU2VjdXJpdHkgUmVzZWFyY2gg
        R3JvdXAxFTATBgNVBAMTDElTUkcgUm9vdCBYMjAeFw0yMDA5MDQwMDAwMDBaFw00
        MDA5MTcxNjAwMDBaME8xCzAJBgNVBAYTAlVTMSkwJwYDVQQKEyBJbnRlcm5ldCBT
        ZWN1cml0eSBSZXNlYXJjaCBHcm91cDEVMBMGA1UEAxMMSVNSRyBSb290IFgyMHYw
        EAYHKoZIzj0CAQYFK4EEACIDYgAEzZvVn4CDCuwJSvMWSj5cz3es3mcFDR0HttwW
        +1qLFNvicWDEukWVEYmO6gbf9yoWHKS5xcUy4APgHoIYOIvXRdgKam7mAHf7AlF9
        ItgKbppbd9/w+kHsOdx1ymgHDB/qo0IwQDAOBgNVHQ8BAf8EBAMCAQYwDwYDVR0T
        AQH/BAUwAwEB/zAdBgNVHQ4EFgQUfEKWrt5LSDv6kviejM9ti6lyN5UwCgYIKoZI
        zj0EAwMDaAAwZQIwe3lORlCEwkSHRhtFcP9Ymd70/aTSVaYgLXTWNLxBo1BfASdW
        tL4ndQavEi51mI38AjEAi/V3bNTIZargCyzuFJ0nN6T5U6VR5CmD1/iQMVtCnwr1
        /q4AaOeMSQ+2b1tbFfLn
        -----END CERTIFICATE-----
This method is primarily used for inline certificates embedded in the code.
SslConfig
SslConfig is the main configuration object for SSL.
It allows configuring:
- Store
- Certificate, key, or PKCS#12 bundle
- ALPN (Application-Layer Protocol Negotiation)
- Modern security flag as per Mozilla guidelines
- SSL timeout for negociations
PKCS#12
To configure SSL with a PKCS#12 bundle:
ssl_config:
  store:
    path: "/etc/ssl/certs/"
  pkcs12: "/opt/cert.p12"
  passphrase: "p12_passphrase"
PEM/DER certificates
For traditional PEM certificates:
ssl_config:
  store:
    path: "/etc/ssl/certs/"
  cert: "/opt/cert.pem"
  key: "/opt/cert.key"
  passphrase: "key_passphrase"
  alpn:
    - "h2"
    - "http/1.1"
  modern_security: true
  ssl_timeout: 3000
If you specify a certificate with a
.derextention, it will be read as DER-encoded.
Self signed certificate
If your server connection is SSL (with the ssl:// or the +ssl:// suffixed protocol) and you don’t specify a certificate and its private key, it’ll generate a self-signed certificate.
If you want to retrieve the generated certificate because you need to trust it from a remote, you can specify a certificate path where the certificate will be written:
ssl_config:
  cert: "/opt/self_signed_cert.pem"
Usage
The SslConfig applies both to server and client configurations.
If you specify a store, it’ll be used:
- On the client-side, to validate server certificates
- On the server-side, to validate client certificates
Similarly, if you own a certificate (with a private key), it can be used as either a client or server certificate.
Stream
The Stream objects have been developed to make socket handling more accessible, with a high level of customization.
Listener
For stream listener, you can use ListenerSetting to configure it.
As a server, you need to specify the URL and optionally SSL.
listener:
  url: "0.0.0.0:8080"
  ssl:
    cert: "/opt/cert.pem"
    key: "/opt/cert.key"
    passphrase: "key_passphrase"
  max_socket: 4000000
Some server implementations may support the
max_socketparameter to prevent overload conditions.
Client
For clients, Stream typically uses TargetSetting for configuration.
You need to specify the URL and optionally SSL. Additionally, you can specify a proxy if needed:
stream:
  url: "worldline.com:443"
  ssl:
    store:
      path: /etc/ssl/certs/
  proxy: "http://myhttpproxy"
  connect_timeout: 3000
The
connect_timeoutsetting prevents infinite waits during connection attempts.
Run ProSA
Once you have created a binary using cargo-prosa, the next step is to run this binary.
If you’ve installed a package or a container, you don’t need to worry about the inner workings. However, if you want to execute the binary manually, this section explains the available parameters.
Command-Line Options
When you run prosa_binary -h, you’ll see output like the following:
Usage: prosa_binary [OPTIONS]

Options:
      --dry_run                   Show how the ProSA will run but doesn't start it. Write the config file if it doesn't exist
  -c, --config <CONFIG_PATH>      Path of the ProSA configuration file [default: prosa.yml]
  -n, --name <NAME>               Name of the ProSA
  -t, --worker_threads <THREADS>  Number of worker threads to use for the main [default: 1]
  -h, --help                      Print help
  -V, --version                   Print version
Dry Run
Use --dry_run to validate your configuration without actually starting ProSA:
prosa_binary -c config.yaml --dry_run
This will:
- Parse and validate your configuration file
- If the configuration file does not exist, write a default one with all your processors’ default settings
- Display how ProSA would run (which processors, which adaptors)
- Exit without starting any processor
This is particularly useful for:
- Generating a starter configuration file for a new ProSA instance
- Validating configuration changes before applying them in production
Configuration Path
The -c / --config option accepts either a single file or a directory:
# Single configuration file
prosa_binary -c /etc/prosa.yml

# Directory containing multiple configuration files
prosa_binary -c /etc/myprosa/
When pointing to a directory, both YAML/TOML files in that directory are merged together. This lets you split configuration across multiple files (e.g., one for observability, one per processor). See the Configuration chapter for details.
Environment Variables
Configuration values can also be set through environment variables. For example:
PROSA_NAME="my-prosa" prosa_binary -c config.yaml
This is useful in containerized environments where configuration is injected via environment variables.
Version Information
The -V flag provides a short version, while --version shows detailed component information:
$ prosa_binary -V
prosa 0.1.0

$ prosa_binary --version
prosa 0.1.0 - core::main::MainProc = { crate = prosa, version = 0.2.0 }
  inj
    Processor: inj::proc::InjProc = { crate = prosa, version = 0.2.0 }
    Adaptor  : inj::adaptor::InjDummyAdaptor = { crate = prosa, version = 0.2.0 }
  stub
    Processor: stub::proc::StubProc = { crate = prosa, version = 0.2.0 }
    Adaptor  : stub::adaptor::StubParotAdaptor = { crate = prosa, version = 0.2.0 }
The verbose output shows:
- The Main processor type and its crate/version
- Each Processor instance with its name, type, crate, and version
- Each Adaptor associated with its processor
This is valuable for debugging version mismatches or verifying that the correct components are compiled in.
Worker Threads
The -t / --worker_threads option controls the number of threads for the Main task’s Tokio runtime (default: 1).
Note that each processor runs in its own thread(s) independently — see Threads for details on per-processor thread configuration.
Graceful Shutdown
ProSA handles Ctrl+C (SIGINT) for graceful shutdown:
- The Main processor receives the signal
- A
Shutdownmessage is sent to every registered processor - Each processor calls
adaptor.terminate()to clean up resources - Each processor deregisters from the Main bus
- The Main processor exits once all processors have stopped
This ensures that in-flight transactions are not abruptly terminated and that resources (connections, files, etc.) are properly released.
Monitoring
If you configured Observability, ProSA offers observability data out of the box.
Metrics
Metrics are useful in processors. To know more, refer to the processor you use to know which metrics they expose. They should export metrics.
But ProSA has also its own metrics to have a global view of what’s running. This generic dashboard will be available soon from Grafana if you want to import it.
Graphical representation
Having a view of every processor and service is important to know if your processors are healthy and if your services are up and running. There is a node graph to view the entire state of ProSA:
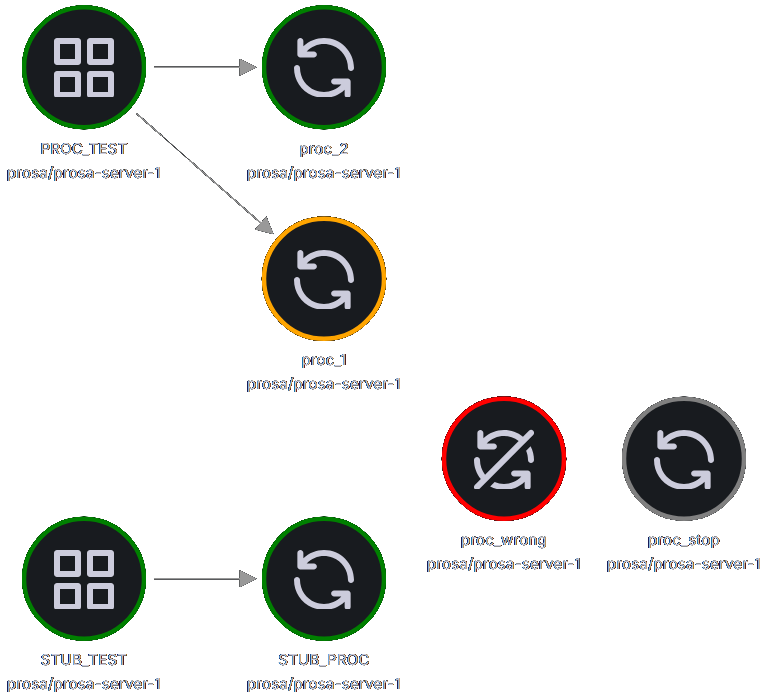
From this graph, you’ll see:
- Processors 🔄
- green indicates that they are running
- orange if they experienced at least one restart
- grey if they are stopped
- red if they crashed
- Services ⠶
- green if at least one processor exposes it
- grey if they are not available
- Links between processors and services representing processors that expose a service
From that graph, you have a complete view of your ProSA state.
System metrics
ProSA provides RAM metrics in order to keep track of process allocation. This could be useful to know if on a VM ProSA is using the RAM, or it’s another process on the host.
It provides 2 type of metrics:
virtualfor virtual RAM usedphysicalfor physical RAM used
To have system metrics, you need to enable the feature
system-metricsfor ProSA.
Traces
Since ProSA is a transactional framework, traces are a must-have to view transaction-relative information.
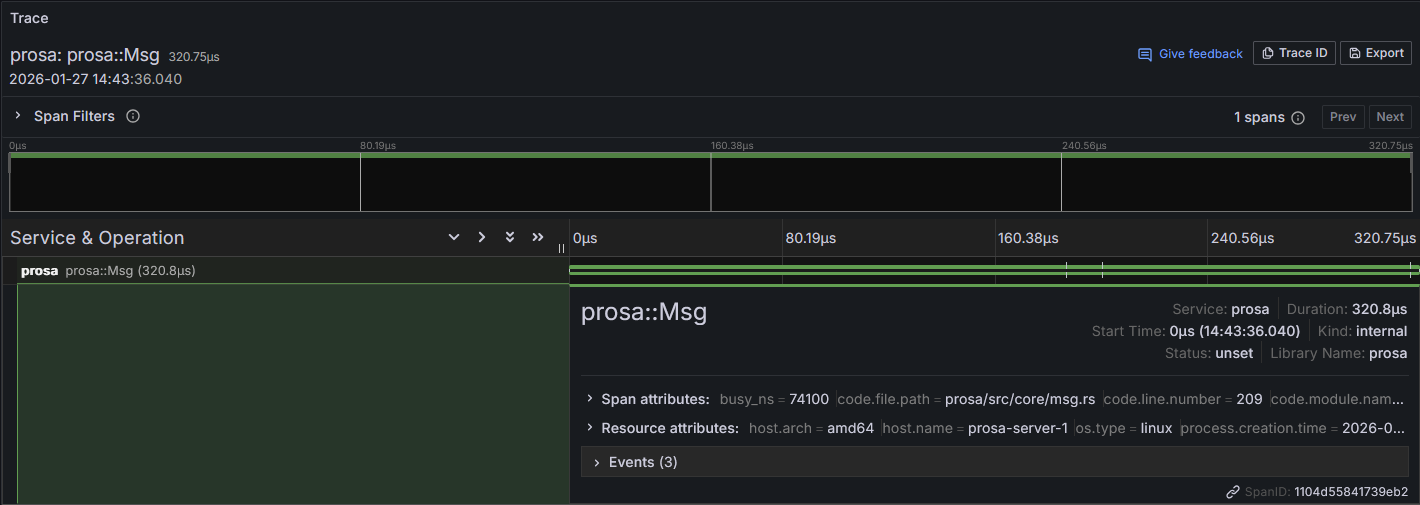
From this global trace, you can have processor spans attached to it.
Logs
All logs generated by ProSA are available. Normally processors should use the ProSA logging system. If they do not, please refer to your processor to know how to handle them.
Puppet ProSA
Table of Contents
Description
ProSA (Protocol Service Adaptor) is a framework designed to provide a simple and lightweight protocol service adaptor for service-oriented architectures. This Puppet module managed with PDK streamlines the process of creating configurations to manage ProSA in your infrastructure. It is capable of configuring and managing a range of processors. For more information on deploying ProSA, please refer to cargo-prosa.
Setup
What the ProSA module affects
- Service and configuration files for ProSA
- ProSA processor configuration files
Setup Requirements
This module does not install dependencies required for your specific ProSA instance, such as OpenSSL. You will need to install these dependencies separately according to your ProSA setup.
Beginning with prosa
To have Puppet install ProSA with the default parameters, declare the [prosa][https://forge.puppet.com/modules/worldline/prosa/reference#prosa] class:
class { 'prosa': }
When you declare this class with the default options, the module:
- Installs the ProSA instace binary from the configured bin_repo.
- Generate configuration files in the
conf_dir. - Creates and starts a ProSA service.
Usage
ProSA base
To set up ProSA, you need to use the [prosa][https://forge.puppet.com/modules/worldline/prosa/reference#prosa] class.
From this class, you should specify the binary repository to retrieve the ProSA binary. Additionally, observability is configured by default, but you may need to specify parameters based on your particular stack. For more details on configuration, please refer to the ProSA configuration guide.
class { 'prosa':
  bin_repo        => 'https://user:password@binary.repo.com/repository/prosa-1.0.0.bin',
  telemetry_level => 'info',
  observability   => {
    'metrics' => {
      'otlp' => {
        'endpoint' => 'grpc://opentelemetry-collector:4317',
      },
    },
    'traces' => {
      'otlp' => {
        'endpoint' => 'grpc://opentelemetry-collector:4317',
      },
      'stdout' => {
        'level' => 'info',
      },
    },
    'logs' => {
      'otlp' => {
        'endpoint' => 'grpc://opentelemetry-collector:4317',
      },
      'stdout' => {
        'level' => 'info',
      },
    },
  }
}
With this configuration, ProSA will be installed and ready to accept processors. Configuring processors is the next step.
Configuring Processors
Processors are configured using the prosa::proc defined type.
You can set them up individually or use prosa::processors for all:
class { 'prosa::processors':
  processors => {
    'stub' => {
      'proc_settings' => {
        'service_names' => ['test'],
      },
    },
    'inj' => {
      'proc_settings' => {
        'service_name' => 'test',
      },
    },
  }
}
Since processors have different configurations, proc_settings is provided as a Hash to accommodate all necessary configuration options.
To determine which configurations to specify, refer to the documentation for the corresponding processor.
Reference
For information on classes, types and functions see the REFERENCE.md
Limitations
Limitations are associated with the ProSA binary generated with cargo-prosa. You need to pay attention to the compiled architecture of your binary. Additionally, if you are using external binaries (e.g., OpenSSL), you’ll need to install them independently.
Development
For development guidelines, please follow contributing rules.
If you submit a change to this module, be sure to regenerate the reference documentation as follows:
puppet strings generate --format markdown --out REFERENCE.md
Acceptance tests are runs with litmus
Authors
Worldline
Cloud
ProSA is intended to be cloud native/agnostic. In this subsection, you’ll find examples for deploying it on a Cloud PaaS1.
Most of the time, there are PaaS offerings that work with Docker containers and Rust runtimes.
Docker containers
To build a Docker image for your ProSA, refer to the Cargo-ProSA Container Select a base image that suits your PaaS requirements and push the generated image to your cloud repository.
You’ll find an example in the subsection for GCP Cloud Run
Rust runtime
If your PaaS allows you to use the Rust runtime to run ProSA, you need to use the project generated by Cargo-ProSA.
For an example, refer to the subsection for Clever Cloud
-
Platform as a service - Run ProSA as a software without worrying about hardware, system, or infrastructure. ↩
GCP - Cloud Run
TODO
Clever Cloud
TODO
Putting It All Together
Now that you’re familiar with Cargo-ProSA, configuration, observability, and running ProSA, let’s walk through a complete example from scratch using the built-in processors.
Prerequisites
You need Rust and Cargo installed, along with cargo-prosa:
cargo install cargo-prosa
Create and scaffold a project
cargo prosa new my-first-prosa
cd my-first-prosa
This generates a Rust project with a ProSA.toml descriptor, a build.rs, and a main.rs that will be auto-generated from your ProSA configuration.
You can inspect the available components with:
cargo prosa list
This shows all discovered components: Main, TVF, Processors, and Adaptors.
Add processors
Add a stub processor that will respond to requests, and an injector that will send requests:
cargo prosa add -n stub-1 -a StubParotAdaptor stub
cargo prosa add -n inj-1 -a InjDummyAdaptor inj
-nsets the processor instance name (used in configuration)-aselects which adaptor to use
Your ProSA.toml file now contains the processor configuration. You can also edit this file manually.
Generate and edit the configuration
Build the project and retrieve the generated configuration from target/config.yml (or target/config.toml).
You can also generate a default configuration using --dry_run (see Run ProSA for details on this flag):
cargo run -- -c config.yaml --dry_run
Then edit config.yaml to wire the injector to the stub. The stub needs to declare a service name, and the injector needs to target that same service:
name: "my-first-prosa"
observability:
  level: debug
  metrics:
    stdout:
      level: info
  traces:
    stdout:
      level: debug

stub_1:
  service_names:
    - "TEST_SERVICE"

inj_1:
  service_name: "TEST_SERVICE"
  max_speed: 1.0
This configures:
- The stub to respond to requests on
"TEST_SERVICE" - The injector to send 2 transactions per second to
"TEST_SERVICE" - Observability output to stdout so you can see what’s happening
Run it
cargo run -- -n "MyFirstProSA" -c config.yaml
You should see log output showing:
- ProSA starting with the configured name
- The stub processor registering
TEST_SERVICE - The injector discovering the service and starting to send transactions
- Responses flowing back from the stub to the injector
Press Ctrl+C to stop (see Graceful Shutdown).
What’s next?
You now know how to build and operate a ProSA instance. The next chapters cover how to develop your own components:
- Adaptor — write custom protocol adaptors
- Processor — write custom processors with their own business logic
Adaptor
This chapter is for application developers who want to know how to build an application using existing ProSA processors.
This chapter will be the most abtract of all, as the Adaptor’s implementation is up to the processor developer. However, developers need to follow certain guidelines, which will be outlined here. These guidelines are also useful for processor developers to ensure they expose their processor effectively.
Adaptors act as a simplified environment for application developers such that they can solely focus on working on their business solution without worrying about the underlying network protocol that will transport their messages. They are designed to provide a simple interface for those who may not be familiar with protocols. You know what processing needs to be done on a specific message, but not the underlying protocol that transports it.
Relation
Adaptors are assigned to a processor. They are called by the processor, so they need to implement all the interfaces the processor requires; otherwise, they won’t function properly.
A processor can only use one adaptor when running.
flowchart LR
    ext(External System)
    adapt(<b>Adaptor</b>)
    proc(Processor)
    ext <-- Protocol Exchange --> adapt
    subgraph Processor
    adapt <-- protocol adaptation --> proc
    end
The adaptor should be viewed as an interface between the internal ProSA TVF messaging system and the external connected system.
TVF
Tag Value Field is the internal message interface used by ProSA.
It’s not a full-fledged format but a Rust trait that defines what a message format should support.
Currently, only the SimpleStringTvf implementation exists. However, in the future, others could implement the TVF trait, such as ProtoBuf, and more.
Usage
In ProSA, Tvf is used as a generic message type that can support various serialization strategies.
The trait allows you to:
- Add fields using
put_*methods - Retrieve fields using
get_*methods - Access information from the container
- …
Most of the time, when using a component that use TVF, you’ll see a generic declaration like:
struct StructObject<M>
where
    M: 'static
        + std::marker::Send
        + std::marker::Sync
        + std::marker::Sized
        + std::clone::Clone
        + std::fmt::Debug
        + prosa_utils::msg::tvf::Tvf
        + std::default::Default,
{
    fn create_tvf() -> M {
        let buffer = M::default();
        buffer.put_string(1, "value");
        println!("TVF contains: {buffer:?}");
        buffer
    }
}
To create a TVF, the
Defaulttrait must be implemented.
Good to have are
CloneandDebugfor your TVF. When TVFs are used for messaging,SendandSyncare essential to safely move them across threads.
Constructing TVF Messages with the tvf! Macro
Instead of manually calling put_* methods one by one, you can use the tvf! procedural macro to construct TVF messages with a concise syntax.
Basic usage (map)
Create a TVF with key-value pairs using =>:
use prosa_macros::tvf;
use prosa_utils::msg::simple_string_tvf::SimpleStringTvf;

let message = tvf!(SimpleStringTvf {
    1 => "hello",
    2 => 42,
    3 => 3.14,
});
Integer values are inferred as signed (i64) by default. Use type suffixes or as casts to specify other types:
let message = tvf!(SimpleStringTvf {
    1 => 2,              // signed (i64)
    2 => 4usize,         // also signed
    3 => 1 as Unsigned,  // unsigned (u64)
    4 => 2.5 as Float,   // float (f64)
});
Type annotations
Use as Type to explicitly set the field type:
| Annotation | Rust type | Example |
|---|---|---|
as Unsigned | u64 | 1 as Unsigned |
as Signed | i64 | -5 as Signed |
as Float | f64 | 3.14 as Float |
as Byte | u8 | 22 as Byte |
as Bytes | Bytes | 0x01020304 as Bytes |
as Date | NaiveDate | "1995-01-10" as Date |
as DateTime | NaiveDateTime | "2023-06-05 15:02:00.000" as DateTime |
Lists
Use [ ] to create sequential fields indexed starting from 1:
let list = tvf!(SimpleStringTvf [
    "first element",   // index 1
    "second element",  // index 2
    42,                // index 3
]);
Nested buffers
Nest TVF structures inside other TVF messages:
let message = tvf!(SimpleStringTvf {
    1 => 2,
    5 => [
        1 as Unsigned,
        2 as Float,
        3,
        "four",
        5 as Byte,
        {
            1 => "nested object",
            2 => 0x00010203 as Bytes,
        }
    ],
    6 => "1995-01-10" as Date,
    200 => "2023-06-05 15:02:00.000" as DateTime,
});
Lists can contain nested maps ({ }), and maps can contain nested lists ([ ]), allowing arbitrary depth.
Implement your own TVF
If you have your own internal format, you can implement the TVF trait on your own and expose your TVF struct:
impl Tvf for MyOwnTvf {
    // All trait method must be implement here
}
Make sure to also implement:
Default: to create an empty or initial TVFSend/Sync: to safely transfer across threadsClone: if duplication of buffers is neededDebug: To enable easy debugging and inspection
Declare your custom TVF
When you implement your own TVF, you need to expose it in your Cargo.toml metadata as discussed in the previous chapter.
To do this, add the following to your Cargo.toml file:
[package.metadata.prosa]
tvf = ["tvf::MyOwnTvf"]
Be sure to specify the entire path of your implementation, tvf::MyOwnTvf, in this case, if you place it in src/tvf.rs.
Handling sensitive data
At Worldline, since we process payments, messages may contain sensitive data. This data must not be printed or extracted from the application to ensure security.
To address this, ProSA provides the TvfFilter trait, which allows filtering and masking sensitive fields.
Depending on your message, sensitive field may vary.
Since TvfFilter is a trait, you can implement your own filter tailored to your message format.
Adaptor creation
Adaptors strongly depend on the underlying processor implementation. Their structure varies according to the choices of the processor developer. Sometimes you will have a wide latitude for customization, while other times the processor will need to be restrictive, especially regarding secrets or security considerations.
However, we’ll describe good practices for adaptor design to help you understand concepts that you’ll encounter most of the time.
Instantiation
A Processor uses an Adaptor to transform messages, so you typically need a single Adaptor instance to perform this role.
This adaptor instance must be both Send and Sync.
pub trait MyTraitAdaptor<M>
where
    M: 'static
        + std::marker::Send
        + std::marker::Sync
        + std::marker::Sized
        + std::clone::Clone
        + std::fmt::Debug
        + prosa::core::msg::Tvf
        + std::default::Default,
{
    /// Method called when the processor spawns
    /// This method is called only once, so the processing will be thread safe
    fn new(proc: &MyProc<M>) -> Result<Self, Box<dyn ProcError + Send + Sync>>
    where
        Self: Sized;
}
Most of the time, the processor is provided as a parameter to the adaptor’s constructor, allowing you to retrieve all necessary information (e.g., settings, name, etc.).
It’s preferable to provide a new() method to create your adaptor, rather than relying on default(), because new() gives you access to processor settings and other information.
Additionally, new() can fail with a ProcError or a dedicated error type if the processor cannot start.
Processing
When you use or develop an adaptor, you need to consider that you may have to process both internal TVF request/response messages, as well as message objects intended for external systems.
To summarize, here’s a graph with all typical interactions:
flowchart LR
    internal[ProSA internal]
    adaptor[Adaptor / Processor]
    external[External system]
    internal-- request (TVF) -->adaptor
    adaptor-- response (TVF) -->internal
    adaptor-- request (protocol) -->external
    external-- response(protocol) -->adaptor
In this architecture, if your adaptor needs to send external requests originating from internal messages, it may look like this:
pub struct ExternalObjectRequest {}
pub struct ExternalObjectResponse {}

pub trait MyTraitAdaptor<M>
where
    M: 'static
        + std::marker::Send
        + std::marker::Sync
        + std::marker::Sized
        + std::clone::Clone
        + std::fmt::Debug
        + prosa::core::msg::Tvf
        + std::default::Default,
{
    /// Method to process incoming requests from internal
    fn process_internal_request(&mut self, request: &M) -> ExternalObjectRequest;

    /// Method to process outgoing requests to external system
    fn process_external_response(&mut self, response: &ExternalObjectResponse) -> M;
}
Conversely, if your adaptor needs to handle incoming external requests and provide corresponding internal responses, it may take this shape:
pub struct ExternalObjectRequest {}
pub struct ExternalObjectResponse {}

pub trait MyTraitAdaptor<M>
where
    M: 'static
        + std::marker::Send
        + std::marker::Sync
        + std::marker::Sized
        + std::clone::Clone
        + std::fmt::Debug
        + prosa::core::msg::Tvf
        + std::default::Default,
{
    /// Method to process incoming requests from external system
    fn process_external_request(&mut self, request: &ExternalObjectRequest) -> M;

    /// Method to process outgoing requests to internal
    fn process_internal_response(&mut self, response: &M) -> ExternalObjectResponse;
}
Additional features
You can leverage Rust traits to enhance the adaptor specification.
For example, you can use associated const values in traits, such as setting a user agent.
pub trait MyTraitAdaptor
{
    const USER_AGENT: &str;
}

impl<M> StubAdaptor<M> for StubParotAdaptor
where
    M: 'static
        + std::marker::Send
        + std::marker::Sync
        + std::marker::Sized
        + std::clone::Clone
        + std::fmt::Debug
        + prosa::core::msg::Tvf
        + std::default::Default,
{
    const USER_AGENT: &str = "ProSA user agent";
}
Adaptor declaration
As you saw with cargo-prosa, available adaptor can be listed using cargo prosa list.
This allows you to easily add your adaptor to the ProSA.toml configuration file.
To build this list, cargo-prosa leverages cargo metadata. Thanks to this, it can retrieve metadata from your dependencies and show the list of adaptors you have defined.
To declare your own adaptor, add the following metadata to your Cargo.toml:
[package.metadata.prosa.<processor_name>]
adaptor = ["<your crate name>::<path to your adaptor>"]
An adaptor is always related to a processor. That’s why you need to declare your adaptor under the relevant processor name.
The adaptor field is a list. So you can declare as many adaptors as you want. In most cases, there are multiple adaptors per processor.
For an example, see the ProSA Cargo.toml.
You can also include your processor declaration in this metadata block if you declare your adaptor in the same crate as your processor.
This declaration step is very important because it simplifies the build process with cargo-prosa.
Observability
As discussed in the Configuration chapter, ProSA uses the Opentelemetry stack to provide metrics, traces and logs. All required settings are described in this chapter.
This section explains how you can use observability features for your own purposes. When you create an adaptor, you may want to generate custom metrics, traces or logs from relevant data you are processing.
It is important to understand how to implement these features within ProSA, as ProSA handles much of the integration for you.
Each time you’ll need to include opentelemetry dependency to your project:
opentelemetry = { version = "0.29", features = ["metrics", "trace", "logs"] }
Metrics
Metrics in ProSA are managed using the OpenTelemetry Meter. With the meter, you can declare counters, gauges, and more.
A meter is created from the main task or from processors. You create your metrics using this meter object.
fn create_metrics<M>(proc_param: prosa::core::proc::ProcParam<M>)
where
  M: Sized + Clone + Tvf,
{
  // Get a meter to create your metrics
  let meter = proc_param.meter("prosa_metric_name");

  // Create a gauge for your metric
  let gauge_meter = meter
    .u64_gauge("prosa_gauge_metric_name")
    .with_description("Custom ProSA gauge metric")
    .build();

  // Record your value for the gauge with custom keys
  gauge_meter.record(
    42u64,
    &[
        KeyValue::new("prosa_name", "MyAwesomeProSA"),
        KeyValue::new("type", "custom"),
    ],
  );
}
If you want to create asynchronous metrics with regular updates, for example triggered by messages, you can do:
fn create_async_metrics<M>(proc_param: prosa::core::proc::ProcParam<M>) -> tokio::sync::watch::Sender<u64>
where
  M: Sized + Clone + Tvf,
{
  // Get a meter to create your metrics
  let meter = proc_param.meter("prosa_async_metric_name");

  let (value, watch_value) = tokio::sync::watch::channel(0u64);
  let _observable_gauge = meter
    .u64_observable_gauge("prosa_gauge_async_metric_name")
    .with_description("Custom ProSA gauge async metric")
    .with_callback(move |observer| {
      let value = *watch_value.borrow();
      observer.observe(
        value,
        &[
          KeyValue::new("prosa_name", "MyAwesomeProSA"),
          KeyValue::new("type", "custom"),
        ],
      );

      // You can call `observe()` multiple time if you have metrics with different labels
    })
    .build();

  value
}

fn push_metric(metric_sender: tokio::sync::watch::Sender<u64>) {
  metric_sender.send(42);
  // Alternatively, use `send_modify()` if you need to modify the value in place
}
Traces
If you package ProSA with cargo-prosa, traces are automatically configured.
If you want to set it up manually in your Observability setting, use the tracing_init() method.
Once tracing is configured, you can use the Tracing crate anywhere in your code. Tracing create spans and send them automatically to the configured tracing endpoint or to stdout.
Traces is also deeply integrated into ProSA’s internal messaging.
ProSA messages (which inplement the prosa::core::msg::Msg trait) have an internal span that represents the flow of a message through ProSA services.
fn process_prosa_msg<M>(msg: prosa::core::msg::Msg<M>)
where
  M: Sized + Clone + Tvf,
{
  // Enter the span: record the begin time
  // When it drop at the end of function, it end the span.
  let _enter = msg.enter_span();

  tracing::info!("Add an info with the message to the entered span: {msg:?}");

  let msg_span = msg.get_span();
  // You can also retrieve the span of the message if you want to link it to something else.
}
Logs
With traces, standalone logs are often less useful, since events are better attached to spans, making it easier to know which transaction produced a given log message.
However, if you want to log messages, you can use the log crate. Like tracing, logging is provisioned automatically with ProSA.
log::info!("Generate an info log (will not be attached to a trace)");If you configure traces, your logs will automatically be included as part of the traces. This behavior is inherent to how OpenTelemetry tracing works.
Processor
This chapter is intended for advanced developers who want to build their own ProSA processors.
A processor is a central part of ProSA. It’s used to handle the main processing logic.
flowchart LR
    ext(External System)
    adapt(Adaptor)
    tvf(TVF)
    proc(<b>Processor</b>)
    settings(Settings)
    ext <-. Protocol Exchange .-> proc
    adapt <-- internal communication --> tvf
    settings --> Processor
    subgraph Processor
    proc <-- protocol adaptation --> adapt
    end
There are several kinds of processors:
- Protocol - Used to handle a specific protocol and map it to internal TVF messages.
- Internal - Handles only internal messages; useful for modifying or routing messages.
- Standalone - The processor works independently, with no internal messages involved; useful for interacting with external systems.
Processor settings
As you saw in the cargo-prosa chapter, every processor has a configuration object attached to it. You’ll specify your processor settings object when you create your processor in the next chapter.
Settingsis the top-level configuration object, whileProcSettingsis specific to processors.
Creation
To create a processor settings, declare a struct and use the proc_settings macro.
This macro adds necessary members to your struct and implements the ProcSettings trait for you.
From these additional members, you will be able to obtain your adapter configuration and processor restart policy.
You can specify them as configurations for your processor like this:
proc:
    adaptor_config_path: /etc/adaptor_path.yaml
    proc_restart_duration_period: 50
    proc_max_restart_period: 300
    my_param: "test"
And declare your settings like this in Rust:
use serde::{Deserialize, Serialize};

#[proc_settings]
#[derive(Debug, Deserialize, Serialize)]
pub struct MySettings {
    my_param: String,
}
Implementing Default
Since the proc_settings macro adds fields to your struct, it can be tricky to manually implement a default value.
Fortunately, the macro also supports a custom Default implementation that incorporates all required fields:
#[proc_settings]
impl Default for MySettings {
    fn default() -> Self {
        MySettings {
            my_param: "default param".into(),
        }
    }
}
By implementing Default for your settings, you can then create a new function that uses default parameters, for example:
impl MySettings {
    pub fn new(my_param: String) -> MySettings {
        MySettings {
            my_param,
            ..Default::default()
        }
    }
}
Processor creation
A processor in ProSA is an autonomous routine executed within its own thread(s). Processor interact with each other through internal TVF messages.
Creation
The Proc module contains everything you need to create a processor, along with an example processor and configuration.
To create a processor, use the proc macro, and implement the Proc trait.
Given a settings struct named MyProcSettings for your processor, your processor struct declaration would look like this:
#[proc(settings = MyProcSettings)]
pub struct MyProc { /* No members here */ }
The macro currently does not allow you to add members directly to your struct.
This is usually not an issue, as you can instantiate and use variables within internal_run() (the main loop of the processor).
You can still declare methods on your struct as needed:
#[proc]
impl MyProc
{
    fn internal_func() {
        // You can declare additional helper functions here
    }
}
Finally, implement the Proc trait.
Here’s an example skeleton:
#[proc]
impl<A> Proc<A> for MyProc
where
    A: Adaptor + std::marker::Send + std::marker::Sync,
{
    async fn internal_run(&mut self) -> Result<(), Box<dyn ProcError + Send + Sync>> {
        // TODO: Initialize your adaptor here

        // Register the processor if ready to run
        self.proc.add_proc().await?;

        loop {
            if let Some(msg) = self.internal_rx_queue.recv().await {
                match msg {
                    InternalMsg::Request(msg) => {
                        // TODO: process the request
                    }
                    InternalMsg::Response(msg) => {
                        // TODO: process the response
                    }
                    InternalMsg::Error(err) => {
                        // TODO: process the error
                    }
                    InternalMsg::Command(_) => todo!(),
                    InternalMsg::Config => todo!(),
                    InternalMsg::Service(table) => self.service = table,
                    InternalMsg::Shutdown => {
                        adaptor.terminate();
                        self.proc.remove_proc(None).await?;
                        return Ok(());
                    }
                }
            }
        }
    }
}
The generic parameter A represents the adaptor type your processor uses.
Specify in the where clause which traits your adaptor must implement (commonly, Adaptor plus Send and Sync)
Specific TVF
Sometimes, you may want your processor to handle only specific TVF objects, possibly to optimize data handling performance or to provide dedicated logic.
In these cases, explicitly implement the Proc trait for your processor, parameterized by the specific TVF type:
#[proc]
impl<A> Proc<A> for MyProc<SimpleStringTvf>
where
    A: Adaptor + std::marker::Send + std::marker::Sync,
{
    async fn internal_run(&mut self) -> Result<(), Box<dyn ProcError + Send + Sync>> {
        // Custom handling for SimpleStringTvf
    }
}
Processor declaration
In the previous chapter, you learned how to declare your Adaptor. Now it’s time to declare your processor.
As with the Adaptor, you need to declare your processor using cargo metadata. In your Cargo.toml, you should include a section like this:
[package.metadata.prosa.<processor_name>]
proc = "<your crate name>::<path to your processor>"
settings = "<your crate name>::<path to your processor's settings>"
adaptor = []
Of course, in this section you can also list adaptors. You may have generic adaptors that cover most cases.
For an example, see ProSA - Cargo.toml.
If you declare this metadata correctly, you will be able to see your processor, settings, and adaptors when using cargo-prosa.
Error
When making production grade application, error handling is really important. It is out of the question for the application to crash on an unhandled error. And even in such occurrence, it is mandatory to have logs about the root cause of such crash.
If there is one advice that we learn implementing ProSA is to avoid using any method that can result in a panic (such as .unwrap()) and prefer handling every error correctly.
Errors should be forwarded to the caller, transformed into an other error type using the From trait or handled properly when encountered.
use thiserror::Error;
use prosa::core::service::ServiceError;

#[derive(Debug, Error)]
/// ProSA specific processor error
pub enum ProcSpecificError {
    /// IO error
    #[error("Proc IO error `{0}`")]
    Io(#[from] std::io::Error),
    /// Other error
    #[error("Proc other error `{0}`")]
    Other(String),
}

impl From<ProcSpecificError> for ServiceError {
    fn from(e: ProcSpecificError) -> Self {
        match e {
            ProcSpecificError::Io(io_error) => {
                ServiceError::UnableToReachService(io_error.to_string())
            }
            ProcSpecificError::Other(error) => ServiceError::UnableToReachService(error),
        }
    }
}

impl ProcError for ProcSpecificError {
    fn recoverable(&self) -> bool {
        match self {
            ProcSpecificError::Io(_error) => false,
            ProcSpecificError::Other(_error) => false,
        }
    }
}
Service Error
When you deal with ProSA internal transaction, you need to pay attention to ServiceError. This type is the base error type that a SOA1 need to handle. In it, you’ll find:
UnableToReachServiceindicate that the service is not available. You should stop sending transaction to it, and send service test until it’s available.Timeoutis an error about your processing time. To guarantee real-time processing, you need to propagate this information to indicate the source that you were not able to process the transaction in time.ProtocolErrorindicate a protocol issue on the source request. In that case you need to check your API version.
Processor error
As you can see when you implement a processor, internal_run method return a ProcError.
This error follow the same principle as the std::error::Error. It’s a trait that you need to implement to be usable for your processor.
By default, it already implements some of the default error types.
But when you implement your processor, a good practice is to define your own specific error with thiserror. Following that, you can implement the prosa::proc::ProcError trait.
Processor restart
Processors have an internal feature to automatically restart if the ProcError is recoverable. It means that the error is transient and the processor can be restarted.
The processor will wait a bit and then try to reestablish the communication. On every error occurrence, the wait delay will increase until a maximum wait time is reached.
-
Service Oriented Architecure. There is a lot of good lecture about Microservice resilience that is useful when you want to implement properly a service. ↩
Service
This part provides all the information you need to work with services within ProSA.
Listening to a service
Single
When your processor starts, you register it with the main task using add_proc().
After declaration, the main task gains access to a queue for sending service requests to your processor.
However, by default, your processor doesn’t listen to any services.
To start listening to a specific service, call add_service_proc()
#[proc]
struct MyProc {}

#[proc]
impl<A> Proc<A> for MyProc
where
    A: Adaptor + std::marker::Send + std::marker::Sync,
{
    async fn internal_run(&mut self) -> Result<(), Box<dyn ProcError + Send + Sync>> {
        // Declare the processor
        self.proc.add_proc().await?;

        // Add all service to listen to
        self.proc
            .add_service_proc(vec![String::from("SERVICE_NAME")])
            .await?;

        loop {
            if let Some(msg) = self.internal_rx_queue.recv().await {
                match msg {
                    InternalMsg::Request(msg) => {
                        // Handle request from a declared service
                    }
                    InternalMsg::Response(msg) => {
                        // Handle response if the processor is registered
                    },
                    InternalMsg::Error(err) => {
                        // Handle errors as if they were responses
                    },
                    InternalMsg::Command(_) => todo!(),
                    InternalMsg::Config => todo!(),
                    InternalMsg::Service(table) => self.service = table,
                    InternalMsg::Shutdown => {
                        self.proc.remove_proc(None).await?;
                        return Ok(());
                    }
                }
            }
        }
    }
}
Multiple
When designing more complex processors, you may need to handle multiple subtasks, each requiring interactions with ProSA services.
In this case, you can declare multiple listener subtasks, each of which subscribes individually to its relevant service(s).
#[proc]
struct MyProc {}

#[proc]
impl<A> Proc<A> for MyProc
where
    A: Adaptor + std::marker::Send + std::marker::Sync,
{
    async fn internal_run(&mut self) -> Result<(), Box<dyn ProcError + Send + Sync>> {
        // Declare the processor
        self.proc.add_proc().await?;

        // Create a bus queue for subtask communication
        let (tx_queue, mut rx_queue) = tokio::sync::mpsc::channel(2048);
        let sub_proc = self.proc.clone();
        let subtask_id = 1;

        tokio::spawn(async move {
            // Register the processor with the main task
            sub_proc
                .add_proc_queue(tx_queue.clone(), subtask_id)
                .await?;

            // Register a service for this subtask only
            sub_proc.add_service(vec![String::from("SERVICE_NAME")], subtask_id).await?;

            // ...subtask logic...

            // Remove the service if it is no longer available
            sub_proc.remove_service(vec![String::from("SERVICE_NAME")], subtask_id).await?;

            loop {
                // Local service table for the task
                let service = ServiceTable::default();
                if let Some(msg) = rx_queue.recv().await {
                    match msg {
                        InternalMsg::Request(msg) => {
                            // Handle request for this subtask
                        }
                        InternalMsg::Response(msg) => {
                            // Handle response (must have registered the processor)
                        },
                        InternalMsg::Error(err) => {
                            // Handle errors as if they were responses
                        },
                        InternalMsg::Command(_) => todo!(),
                        InternalMsg::Config => todo!(),
                        InternalMsg::Service(table) => service = table,
                        InternalMsg::Shutdown => {
                            self.proc.remove_proc(None).await?;
                            return Ok(());
                        }
                    }
                }
            }
        })

        loop {
            if let Some(msg) = self.internal_rx_queue.recv().await {
                match msg {
                    InternalMsg::Request(msg) => {
                        // Handle request from a declared service
                    }
                    InternalMsg::Response(msg) => {
                        // Handle response if the processor is registered
                    },
                    InternalMsg::Error(err) => {
                        // Handle errors as if they were responses
                    },
                    InternalMsg::Command(_) => todo!(),
                    InternalMsg::Config => todo!(),
                    InternalMsg::Service(table) => self.service = table,
                    InternalMsg::Shutdown => {
                        self.proc.remove_proc(None).await?;
                        return Ok(());
                    }
                }
            }
        }
    }
}
Sending messages
Single
Even if your processor only sends messages, it must be registered to receive responses and errors for your requests using add_proc().
After that, you are free to call any services.
#[proc]
struct MyProc {}

#[proc]
impl<A> Proc<A> for MyProc
where
    A: Adaptor + std::marker::Send + std::marker::Sync,
{
    async fn internal_run(&mut self) -> Result<(), Box<dyn ProcError + Send + Sync>> {
        // Register the processor
        self.proc.add_proc().await?;

        // Wait for the service table before sending messages to a service
        loop {
            if let Some(msg) = self.internal_rx_queue.recv().await {
                match msg {
                    InternalMsg::Request(msg) => {
                        // Handle incoming requests if needed
                    }
                    InternalMsg::Response(msg) => {
                        // Handle response
                    },
                    InternalMsg::Error(err) => {
                        // Handle errors
                    },
                    InternalMsg::Command(_) => todo!(),
                    InternalMsg::Config => todo!(),
                    InternalMsg::Service(table) => self.service = table,
                    InternalMsg::Shutdown => {
                        self.proc.remove_proc(None).await?;
                        return Ok(());
                    }
                }
            }

            // Attempt to send a message if the service is available
            if let Some(service) = self.service.get_proc_service("SERVICE_NAME") {
                let trans = RequestMsg::new(
                    String::from("SERVICE_NAME"),
                    M::default(),
                    self.proc.get_service_queue()
                );
                service.proc_queue.send(InternalMsg::Request(trans)).await?;
            }
        }

        Ok(())
    }
}
Multiple
If you have multiple subtasks, each must use its own queue to ensure responses are routed to the correct subtask. The logic is similar to single senders, but you specify the queue when sending messages.
#[proc]
struct MyProc {}

#[proc]
impl<A> Proc<A> for MyProc
where
    A: Adaptor + std::marker::Send + std::marker::Sync,
{
    async fn internal_run(&mut self) -> Result<(), Box<dyn ProcError + Send + Sync>> {
        // Register the processor
        self.proc.add_proc().await?;

        // Create a queue for subtask communication
        let (tx_queue, mut rx_queue) = tokio::sync::mpsc::channel(2048);
        let tx_msg_queue = tx_queue.clone();
        let sub_proc = self.proc.clone();
        let subtask_id = 1;

        tokio::spawn(async move {
            // Register the processor to the main task
            sub_proc
                .add_proc_queue(tx_queue.clone(), subtask_id)
                .await?;

            loop {
                if let Some(msg) = rx_queue.recv().await {
                    match msg {
                        InternalMsg::Request(msg) => todo!()
                        InternalMsg::Response(msg) => {
                            // Handle response for this subtask
                        },
                        InternalMsg::Error(err) => {
                            // Handle errors for this subtask
                        },
                        InternalMsg::Command(_) => todo!(),
                        InternalMsg::Config => todo!(),
                        InternalMsg::Service(table) => self.service = table,
                        InternalMsg::Shutdown => {
                            self.proc.remove_proc(None).await?;
                            return Ok(());
                        }
                    }
                }
            }

            // Attempt to send a message if the service is available
            if let Some(service) = self.service.get_proc_service("SERVICE_NAME") {
                let trans = RequestMsg::new(
                    String::from("SERVICE_NAME"),
                    M::default(),
                    tx_msg_queue.clone()
                );
                service.proc_queue.send(InternalMsg::Request(trans)).await?;
            }
        })

        Ok(())
    }
}
Events
ProSA, being a transactional framework, makes events extremely useful when developing a processor.
In the next sections, we’ll go over all event-based objects provided by ProSA.
Messages with timeout - PendingMsgs
Your processor should handle timeouts for transactions in order to drop them if they cannot be processed in time.
That’s the purpose of the PendingMsgs object.
There are three important methods you need to use for this object:
push()Add your message to be monitored for timeouts.pull_msg()Remove your message when you have received its response and no longer need to check its timeout.pull()Async method to retrieve all messages that have expired (timed out).
#[proc]
struct MyProc {}

#[proc]
impl<A> Proc<A> for MyProc
where
    A: Default + Adaptor + std::marker::Send + std::marker::Sync,
{
    async fn internal_run(
        &mut self,
        _name: String,
    ) -> Result<(), Box<dyn ProcError + Send + Sync>> {
        let mut adaptor = A::default();
        self.proc.add_proc().await?;
        self.proc
            .add_service_proc(vec![String::from("PROC_TEST")])
            .await?;
        let mut interval = time::interval(time::Duration::from_secs(4));
        let mut pending_msgs: PendingMsgs<RequestMsg<M>, M> = Default::default();
        loop {
            tokio::select! {
                Some(msg) = self.internal_rx_queue.recv() => {
                    match msg {
                        InternalMsg::Request(msg) => {
                            info!("Proc {} receive a request: {:?}", self.get_proc_id(), msg);

                            // Add to pending messages to track timeout
                            pending_msgs.push(msg, Duration::from_millis(200));
                        },
                        InternalMsg::Response(msg) => {
                            let _enter = msg.enter_span();
                            // Try to retrieve original request; if it already timed out, this returns None
                            let original_request: Option<RequestMsg<SimpleStringTvf>> = pending_msgs.pull_msg(msg.get_id());
                            info!("Proc {} receive a response: {:?}, from original request {:?}", self.get_proc_id(), msg, original_request);
                        },
                        InternalMsg::Error(err) => {
                            let _enter = err.enter_span();
                            info!("Proc {} receive an error: {:?}", self.get_proc_id(), err);
                        },
                        InternalMsg::Command(_) => todo!(),
                        InternalMsg::Config => todo!(),
                        InternalMsg::Service(table) => {
                            debug!("New service table received:\n{}\n", table);
                            self.service = table;
                        },
                        InternalMsg::Shutdown => {
                            adaptor.terminate();
                            warn!("The processor will shut down");
                        },
                    }
                },
                Some(msg) = pending_msgs.pull(), if !pending_msgs.is_empty() => {
                    debug!("Timeout message {:?}", msg);

                    // Return a timeout error message to the sender
                    let service_name = msg.get_service().clone();
                    msg.return_error_to_sender(None, prosa::core::service::ServiceError::Timeout(service_name, 200)).await.unwrap();
                },
            }
        }
    }
}
Regulator - Regulator
The Regulator is used to regulate the flow of transaction to avoid overwhelming a remote peer.
It can be useful if you have a contract with a maximum number of parallel transactions, or limitations on transactions per second.
It serves two main goals:
- Enforce a threshold on transaction flow
- Limit a fixed number of outstanding transactions
All parameters for the regulator are defined in the new() method.
Using the object is pretty simple:
- When you send a transaction, call
notify_send_transaction(). This may block your send if you exceed your allowed rate. - When you receive a transaction, call
notify_receive_transaction(), which signals possible overload at the remote, and helps prevent too many concurrent transactions.
To check if you can send the next transaction, call tick().
This method blocks if you need to wait, and lets you continue if you are within the allowed threshold.
Timed Queue
ProSA introduced a queue system to enhance its functionality.
While this book does not cover the standard queue (for which you can find more details in the ProSA documentation), it focuses on the Timed Queue. This is a novel queuing concept designed for time-sensitive operations.
The TimedQueue follows an SPMC (Single Producer, Multiple Consumers) model, where only the sender can enforce timeouts.
It ensures a regular message flow, as illustrated below:
flowchart LR
    send[Sender]
    queue[(Timed Queue)]
    recv1[Receiver 1]
    recvn[Receiver N]
    send --> queue
    queue --> recv1
    queue --> recvn
However, if a message in the queue expires (because a receiver failed to consume it in time), the sender retrieves the message:
flowchart LR
    send[Sender]
    queue[(Timed Queue)]
    send --> queue
    queue -- timeout --> send
This is the key advantage of the TimedQueue.
Unlike a standard queue, where a message is only returned if explicitly pulled, the TimedQueue allows messages to expire even if they are in the middle of the queue.
In real-time systems, this ensures that every message receives a response within a specified timeframe—even if that response is simply an acknowledgment of a missed deadline.
I/O
Since ProSA is designed to connect to external systems, helpers for I/O operation are essential.
This page covers I/O from server and client perspectives, with a few examples.
Listener
StreamListener type is used to handle server sockets.
It can be instantiated from a ListenerSetting using the bind method.
It supports three types of server sockets:
- UNIX
- TCP
- SSL
Once the object is created, you must call the accept method in a loop to accept client connections.
Each accepted connection will create a Stream socket, which can be managed just like a client socket.
Stream
A Stream represents a client socket or a socket created by a StreamListener when a client connects.
It can be instantiated from a TargetSetting using the connect method.
It supports several types of client sockets:
- UNIX
- TCP
- SSL
- TCP over HTTP proxy
- SSL over HTTP proxy
You can manually connect using the connect_* methods as appropriate.
After creating the socket, you have several options to further configure it, such as:
nodelayttl
IO macro
This section will be documented when the macro becomes stable, or removed if it is not relevant.
Threads
For threading, ProSA relies on Tokio.
Main threads
When you launch your ProSA, you have the option -t, --worker_threads <THREADS> to run the main function with multiple threads.
By default, the main function will start observability tasks and the ProSA main task.
If you pay attention to the threads launched by ProSA for the main task, you’ll see:
- For a single thread:
$ ps H -o 'flag,state,pid,ppid,pgid,pmem,rss,rsz,pcpu,time,cmd,comm' -p `pgrep -f prosa-dummy | head -1`
F S   PID  PPID  PGID %MEM   RSS   RSZ %CPU     TIME CMD                         COMMAND
0 S 26545  2698 26545  0.0  5488  5488  0.0 00:00:00 target/release/prosa-dummy  prosa-dummy
- For two threads (your program thread and 2 main threads):
$ ps H -o 'flag,state,pid,ppid,pgid,pmem,rss,rsz,pcpu,time,cmd,comm' -p `pgrep -f prosa-dummy | head -1`
F S   PID  PPID  PGID %MEM   RSS   RSZ %CPU     TIME CMD                         COMMAND
0 S 26591  2698 26591  0.0  7576  7576  0.0 00:00:00 target/release/prosa-dummy  prosa-dummy
1 S 26591  2698 26591  0.0  7576  7576  0.0 00:00:00 target/release/prosa-dummy  main
1 S 26591  2698 26591  0.0  7576  7576  0.0 00:00:00 target/release/prosa-dummy  main
Processors threads
Processors, by default, use a single-threaded Tokio runtime. Having a seperate runtime avoids any interference between processors.
Most of the time, having only one thread per processor is sufficient.
However, the behavior can be changed by implementing the get_proc_threads() method of the Proc trait.
This method return 1 indicating that your processor will spawn a runtime with a single thread.
If you wish for your processor to run on the main runtime, you can return 0.
Finally, if you want to allocate multiple threads for your processor, you can return the desired number of threads to spawn from this method. Of course, if you implement it, you can get the number of threads from your processor settings by adding a field for it.
Built-in Processors
ProSA ships with two built-in processors designed for testing and development: InjProc (Injector) and StubProc (Stub). Together, they let you validate your ProSA setup without writing any custom processor code.
InjProc — Injector
The injector processor sends transactions to a target service at a regulated speed. It is useful for load testing and functional validation.
How it works
- Waits for the target service to appear in the service table
- Calls the adaptor’s
build_transaction()to create a message - Sends the message to the target service at a controlled rate
- Receives responses and calls the adaptor’s
process_response() - Handles errors: timeouts and unreachable services trigger a cooldown; other errors stop the processor
Settings
Configure the injector through InjSettings in your YAML:
inj-1:
  service_name: "MY_SERVICE"  # Target service name to inject into
  max_speed: 5.0              # Maximum transactions per second (default: 5.0)
  timeout_threshold:
    secs: 10                  # Cooldown duration on timeout/unreachable (default: 10s)
    nanos: 0
  max_concurrents_send: 1     # Max parallel transactions (default: 1)
  speed_interval: 15          # Number of samples for speed calculation (default: 15)
InjAdaptor Trait
To customize what the injector sends and how it processes responses, implement the InjAdaptor trait:
pub trait InjAdaptor<M>
where
    M: Tvf + Clone + Debug + Default + Send + Sync + 'static,
{
    /// Called once when the processor starts
    fn new(proc: &InjProc<M>) -> Result<Self, Box<dyn ProcError + Send + Sync>>
    where
        Self: Sized;

    /// Build the next transaction to inject
    fn build_transaction(&mut self) -> M;

    /// Process the response (optional — default ignores responses)
    fn process_response(
        &mut self,
        response: M,
        service_name: &str,
    ) -> Result<(), Box<dyn ProcError + Send + Sync>> {
        Ok(())
    }
}
InjDummyAdaptor
The built-in InjDummyAdaptor creates minimal messages with "DUMMY" in field 1. It is useful for quick smoke tests:
#[derive(Adaptor)]
pub struct InjDummyAdaptor {}

impl<M> InjAdaptor<M> for InjDummyAdaptor
where
    M: Tvf + Clone + Debug + Default + Send + Sync + 'static,
{
    fn new(_proc: &InjProc<M>) -> Result<Self, Box<dyn ProcError + Send + Sync>> {
        Ok(Self {})
    }

    fn build_transaction(&mut self) -> M {
        let mut msg = M::default();
        msg.put_string(1, "DUMMY");
        msg
    }
}
Metrics
The injector exposes a histogram metric prosa_inj_request_duration (in seconds) with attributes:
proc: processor nameservice: target service nameerr_code:"0"for success, or the service error code
StubProc — Stub
The stub processor responds to incoming requests. It is useful for mocking services during development or testing.
How it works
- Registers for the configured service names
- Receives incoming
Requestmessages - Calls the adaptor’s
process_request()to produce a response - Returns the response to the caller
Settings
Configure the stub through StubSettings in your YAML:
stub-1:
  service_names:
    - "MY_SERVICE"
    - "ANOTHER_SERVICE"
StubAdaptor Trait
To customize how the stub responds, implement the StubAdaptor trait:
pub trait StubAdaptor<M>
where
    M: Tvf + Clone + Debug + Default + Send + Sync + 'static,
{
    /// Called once when the processor starts
    fn new(proc: &StubProc<M>) -> Result<Self, Box<dyn ProcError + Send + Sync>>
    where
        Self: Sized;

    /// Process an incoming request and return a response
    fn process_request(
        &self,
        service_name: &str,
        request: M,
    ) -> MaybeAsync<Result<M, ServiceError>>;
}
The return type MaybeAsync lets you choose between synchronous and asynchronous processing.
Synchronous response
Return a value directly using .into():
fn process_request(&self, service_name: &str, request: M) -> MaybeAsync<Result<M, ServiceError>> {
    // Echo the request back
    Ok(request).into()
}
Asynchronous response
Use the maybe_async! macro for async processing:
fn process_request(&self, service_name: &str, request: M) -> MaybeAsync<Result<M, ServiceError>> {
    let service_name = service_name.to_string();
    maybe_async!(async move {
        // Simulate async work (e.g., call an external API)
        tokio::time::sleep(std::time::Duration::from_millis(100)).await;
        let mut msg = request.clone();
        msg.put_string(1, format!("response for {}", service_name));
        Ok(msg)
    })
}
Built-in Adaptors
StubParotAdaptor — echoes the request back as-is (synchronous):
fn process_request(&self, _service_name: &str, request: M) -> MaybeAsync<Result<M, ServiceError>> {
    Ok(request.clone()).into()
}
StubAsyncParotAdaptor — echoes the request back after a 100ms delay (asynchronous):
fn process_request(&self, _service_name: &str, request: M) -> MaybeAsync<Result<M, ServiceError>> {
    maybe_async!(async move {
        tokio::time::sleep(std::time::Duration::from_millis(100)).await;
        Ok(request)
    })
}
Using Injector and Stub Together
The injector and stub pair is ideal for validating your ProSA setup. Wire them together by pointing the injector’s service_name at a service declared by the stub:
# Stub responds to "TEST_SERVICE"
stub-1:
  service_names:
    - "TEST_SERVICE"

# Injector sends to "TEST_SERVICE"
inj-1:
  service_name: "TEST_SERVICE"
  max_speed: 10.0
When you run ProSA with this configuration, the injector will continuously send messages to the stub, which echoes them back. You can observe the transaction flow through metrics and traces.