First steps
We have just used the Angular CLI command ng new <my-project>. This command creates a workspace with a root-level application named my-project and installs the necessary Angular npm packages in the new workspace. The workspace root folder contains various support and configuration files.
Creating an initial skeleton application at the root level of the workspace along with its end-to-end tests is the default behaviour of the ng new command. This behaviour is suitable for a multi-repo development style where each application resides in its own workspace. It is also the recommanded way for beginner and intermediate users.
Angular also supports workspaces with multiple projects. This is appropriate for a monorepo development style where there is a single repository and a global configuration for all Angular projects in it. It is also suitable for advanced users who are, for instance, developing shareable libraries.
To get started developing with a multi-project workspace, the initial root-level application generation should be skipped.
ng new my-workspace --create-application false
You can then generate apps and libraries with names that are unique whithin the workspace.
cd my-workspace
ng generate application my-first-app
Generated applications go into the projects/ folder instead of a top-level src folder.
File structure
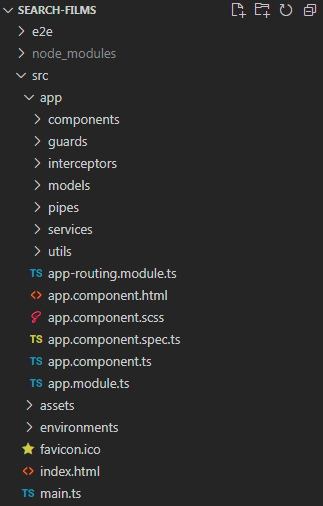
Our previously created project has the following folders and files:
tsconfig.json: the base TypeScript configuration for projects in the workspacetsconfig.app.json: the root application TypeScript configuration file which inherits from the base onetsconfig.spec.json: the e2e tests TypeScript configuration file which inherits from the base oneREADME.md: introductory documentation for the root apppackage.json: configures npm package dependencies that are available to all projects in the workspacepackage-lock.json: provides version information for all packages installed into node_modules by the npm clientangular.json: CLI configuration, including configuration options for build, serve, and test tools that the CLI uses.gitignore: Specifies intentionally untracked files that Git should ignore.editorconfig: Configuration for code editorssrc: Source files for the root-level application projectnode_modules: Provides npm packages to the entire workspacepublic: Contains the favicon initially and is the place for images and other asset files to be copied as-is when you build your application.angular: Cache files
TIP
To ensure that all developers working on a project use the same library versions, it is possible to block the version numbers via the package.json file.
The src folder contains:
styles.scss: Lists CSS files that supply styles for a project. The extension reflects the style preprocessor you have configured for the project.main.ts: The main entry point for your applicationindex.html: The main HTML page that is served when someone visits your site. The CLI automatically adds all JavaScript and CSS files when building your app, so you typically don't need to add any<script>or<link>tags here manually.app: Contains the component files in which your application logic and data are defined
The app folder contains:
app.config.ts: Defines the application configuration that tells Angular how to assemble the application.app.routes.ts: Defines the application's routing configurationapp.html: Defines the HTML template associated with the rootAppcomponent.app.scss: Defines the base stylesheet for the rootAppcomponent.app.ts: Defines the logic for the app's root component, namedApp. The view associated with this root component is the root of the view hierarchy.app.spec.ts: Defines a unit test for the rootAppcomponent.
Text interpolation in templates
Like any other component, the shell App component is distributed over three files. Open the component typescript file (app.ts) and change the value of the title property to 'Search films'
// app.component.ts
import { Component, signal } from '@angular/core'

@Component({
  selector: 'app-root',
  templateUrl: './app.html',
  styleUrls: ['./app.scss']
})
export class App {
  protected readonly title = signal('Search Films')
}
Open the component template file (app.html) and delete the default template generated by the Angular CLI. Replace it with the following line of HTML.
<!-- app.html -->
<h1>{{title()}}</h1>
The double curly braces are Angular's interpolation binding syntax. This interpolation binding presents the component's title property value inside the HTML header tag.
The browser refreshes and displays the new application title.
The simplest way to insert data dynamically into your components is through text interpolation, using the {{myVariable}} syntax. Inside double curly braces, you can specify any valid JavaScript expression except for:
- bitwise operators:
&,&=,~,|=,^=, etc. - object destructuring:
const { name } = person - array destructuring:
const [firstItem] = items - comma operator:
x = (x++, x) - instanceof:
movie instanceof Film - new:
new Film() - regex
- declarations
Add two fields after the title variable in the app.ts file:
// app.ts
protected readonly title = signal('Search Films')
protected readonly orderReference = signal('ABCXYZ')
protected readonly price = signal(17.3)
In the template:
<!--app.html-->
<h1>{{title()}}</h1>
<p>Order ref. {{ orderReference() }} - Total: {{ price().toFixed(2) + "€" }}</p>
The template has access to all the non-private members of the component class. Changing the visibility of price to private will render this error: Property 'price' is private and only accessible within class 'App'.
Interpolation only works on textual content of elements. You should not use it to change the value of HTML attributes and can't use it to insert HTML code. For this, we will see strategies later in the training.
In this example, we formatted the price manually. We will later see that Angular provides a way to declare reusable formatters: pipes.
Working with components
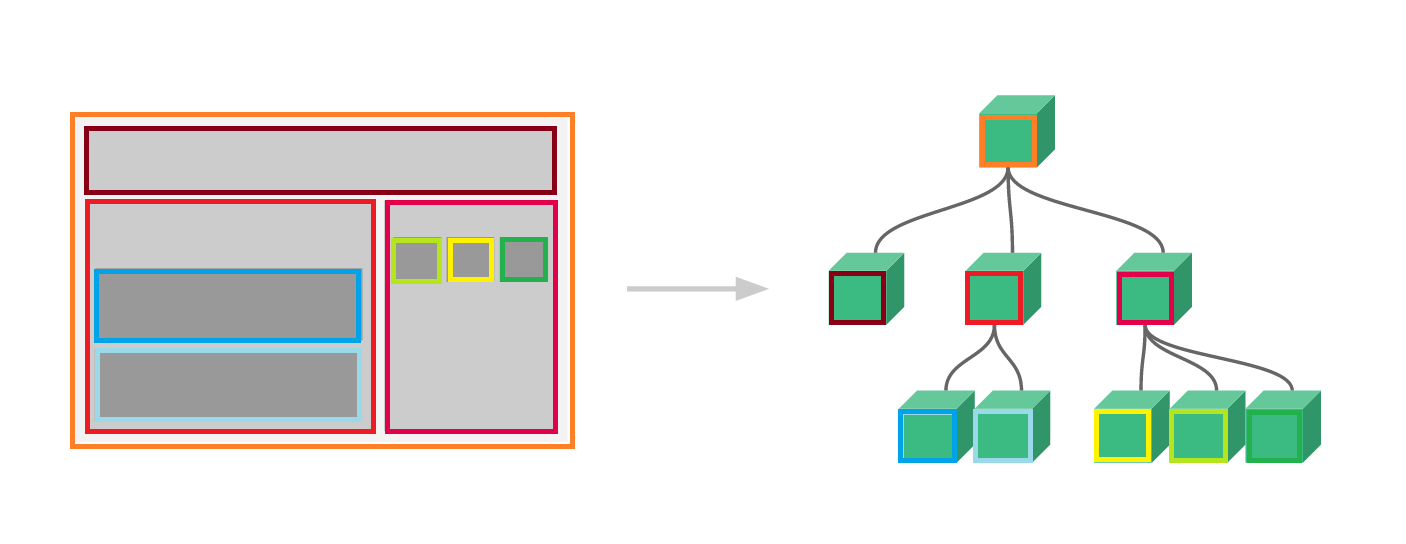
The App component is only the root component of an Angular application. A web application is made of small reusable components, embedded in higher level components to form the layout, the arrangement of your elements on the page. This structure can be described as a component tree. Angular creates, updates, and destroys components as the user moves through the application. The app can take action at each moment in this lifecycle through optional lifecycle hooks, like ngOnInit().
Before generating a second component, let's configure the naming convention of components and other key building blocks of an Angular app. Since Angular 20, the type of building block (component, service, directive) generated is not automatically appended to the file name and class name. That gives more flexibility to teams in their naming choices, however it can easily lead to naming clashs where the component, the service and the DTO have exactly the same class name for instance. This is why we will add the following configuration to the angular.json file to restore the appending of the building block name to the class name and file name.
// angular.json
  "cli": {
    "schematicCollections": [
      "angular-eslint"
    ]
  },
  "schematics": {
    "@schematics/angular:component": {
      "type": "component"
    },
    "@schematics/angular:directive": {
      "type": "directive"
    },
    "@schematics/angular:service": {
      "type": "service"
    },
    "@schematics/angular:guard": {
      "typeSeparator": "."
    },
    "@schematics/angular:interceptor": {
      "typeSeparator": "."
    },
    "@schematics/angular:module": {
      "typeSeparator": "."
    },
    "@schematics/angular:pipe": {
      "typeSeparator": "."
    },
    "@schematics/angular:resolver": {
      "typeSeparator": "."
    }
  }
Let's create a second component. It is advised to generate components using the Angular CLI.
ng g c child #shorthand for ng generate component child
The ng g c command added a child folder containing the ChildComponent files in the app folder.
// child.ts
import { Component, signal } from '@angular/core'

@Component({
  selector: 'app-child',
  imports: [],
  templateUrl: './child.component.html',
  styleUrls: ['./child.component.scss']
})
export class ChildComponent {

}
To link the components together, the child components are declared in their parent's component template, using their selector as a tag. The child component also needs to be added to the imports array of the parent component decorator. A component can be reused as many times as desired. The ChildComponent's selector is app-child. Including this component as a child to the App component is done as follows:
<h1>{{title()}}</h1>
<app-child></app-child>
import { Component, signal } from '@angular/core'
import { ChildComponent } from './child/child.component'

@Component({
  selector: 'app-root',
  imports: [ChildComponent],
  templateUrl: './app.html',
  styleUrl: './app.scss'
})
export class AppComponent {
  protected readonly title = signal('Search Films')
}
TIP
Angular automatically prefixes selectors so that components imported from external libraries are easier to spot. For instance, components from the Material Angular library are all prefixed with mat-. You can change the app prefix in the angular.json configuration file so that it reflects your application name.
NgModules (before Angular 17 and the standalone component architecture)
Nowadays, components are declared as standalone by default. That is why the standalone property is not present in the @Component decorator by default anymore. Before the implementation of standalone, the architecture of an Angular app depended on NgModules. Each component had to be declared in an NgModule to be usable in the application. Each NgModule could declare as many components as the developer saw fit. The module was taking care of making sure that each component had access to its necessary dependencies, making all the necessary imports. With standalone components, this responsibility is now deported to each component. That is why there is now an imports array in the definition of @Component. You may still encounter architectures on the lastest version of Angular making use of NgModules as refactoring a whole application to use standalone components can be a big and risky endeavor.
Behind the scene, the ng g c command used to declare the Child component in the AppModule which was the root module of the application.
// app.module.ts
import { NgModule } from '@angular/core'
import { BrowserModule } from '@angular/platform-browser'

import { AppRoutingModule } from './app-routing.module'
import { AppComponent } from './app.component'
import { ChildComponent } from './child/child.component'

@NgModule({
  declarations: [
    AppComponent,
    ChildComponent
  ],
  imports: [
    BrowserModule,
    AppRoutingModule
  ],
  providers: [],
  bootstrap: [AppComponent]
})
export class AppModule { }
An NgModule is defined by a class decorated with @NgModule(). The @NgModule() decorator is a function that takes a single metadata object, whose properties describe the module. The most important properties are as follows:
declarations: The components, directives, and pipes that belong to this NgModule.exports: The subset of declarations that should be visible and usable in the component templates of other NgModules. (theAppModulehas no reason to export anything because other modules don't need to import the root NgModule)imports: Other modules whose exported classes are needed by component templates declared in this NgModule.providers: Creators of services that this NgModule contributes to the global collection of services; they become accessible in all parts of the app. (You can also specify providers at the component level.)bootstrap: The main application view, called the root component, which hosts all other app views. Only the root NgModule should set the bootstrap property.
While a small application might have had only one NgModule, as the app grows, it was a good practice to refactor the root module into feature modules that represented collections of related functionality. You then either imported these modules into the root module (eagerly loaded) or lazy loaded them asynchronously via the router.
Organising your files
Here is the folder structure we will strive to achieve in the Search Films application:
This folder structure is best suited to simple projects with only one main feature that has its routes defined in one place, the app.route.ts file. As a project grows, feature folders and routes will be introduced and the structure can evolve to this:

The Angular team provides a style guide where they advise to follow such a structure instead of the first one. When in doubt, refer to it.
TIP
By default, the CLI will always generate in the app folder. You can tell it to generate in another folder by passing the path before the name of the element you want it to generate. For instance ng generate component components/dashboard will generate the DashboardComponent 4 files in app/components/dashboard. The components folder is created by the CLI if it doesn't already exist, as well as the dashboard folder.
Practical work: Your first component
If you created the
app-childcomponent, delete it as we won't need it moving forward and remove any reference to it in theAppcomponent. You may get an error in the console where you launched the project once you delete the child component, in that case restart the project.Most apps strive for a consistent look across the application. The CLI generated an empty
styles.scssfile for this purpose. Copy paste the content of the SCSS stylesheet that will serve as basis for all the practical work, downloadable here: styles.scss in it.Create a new component
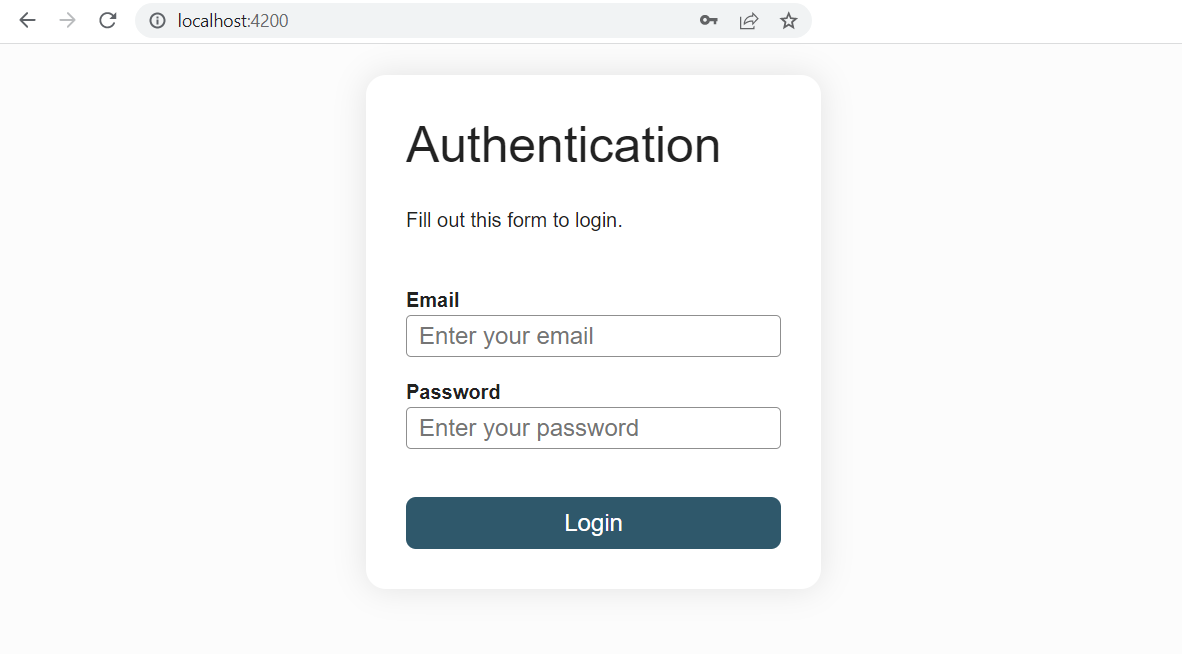
login-formcontaining the following authentication form (don't forget to generate it in the components folder):
<form id="login-form">
  <h1>Authentication</h1>
  <p>Fill out this form to login.</p>

  <label for="email">Email</label>
  <input type="text" placeholder="Enter your email" id="email" name="email" required/>

  <label for="psw">Password</label>
  <input type="password" placeholder="Enter your password" id="psw" name="password" required/>

  <button type="submit">Login</button>
</form>
Delete the existing content of the
Appcomponent template (html file of the component) if it is not already done and the variables declared in theAppclass. Display theLoginFormComponentin theAppcomponent by addding<app-login-form></app-login-form>in its template. Don't forget to add theLoginFormComponentclass to theimportsarray of the @Component definition of theAppclass (if you used VSCode aucompletion to add the new component to the App component template, then it should be added automatically).Complete the
login-form.tsfile: add a fieldprotected readonly title = signal('Authentication'). Then, use text interpolation in the template to pass the title from the component ts file to the h1 tag. Don't forget that you need to invoke a signal to read its value.Don't forget to commit
Expected result